As a hair stylist and extension supplier, I understand that proper application and maintenance of K-Tip Hair Extensions are crucial factors in ensuring their quality, longevity, and seamless blending with natural hair.
With this step-by-step guide, we aim to provide hair businesses, salon owners, online retailers, and other industry professionals with the essential knowledge and techniques required for a successful K-Tip Hair Extension experience.
From the initial consultation to the final extension brush styling, we will cover all critical steps, address common mistakes to avoid, share valuable tips and tricks, and highlight best practices for a flawless extension application and maintenance process.
By following this comprehensive guide, you'll be able to offer your clients the stunning transformation they desire while preserving the integrity of their natural hair.
Let's dive into the world of K-Tip Hair Extensions and elevate your skills to new heights!
Understanding K-Tip Hair Extensions
K-Tip Hair Extensions are a revolutionary type of keratin hair extensions that provide an incredibly natural look and feel.
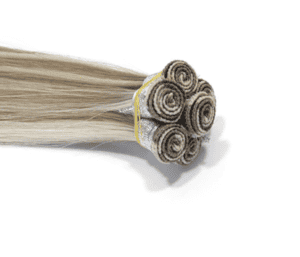
These extensions use tiny, pre-tipped strands made from 100% human Remy hair to add volume, length, or both to your client’s natural hair.
Unlike other types of hair extension application methods, K-Tip Hair Extensions require no heat or glue for application and extensions can be easily removed without damage to protect the natural hair.
This makes them ideal for those looking for a low-maintenance, long-lasting but temporary solution to their styling needs.
K-tip hair extensions are perfect for your clients that have thin and fine hair as the tiny tips are individual strands that won’t add too much weight and make the hair look weighed down.
The real bonus is that K-Tip Hair Extensions are incredibly versatile and can be styled just like natural hair, so your clients will have plenty of lightweight styling products to choose from!
Now let's get into the nitty-gritty of how to apply and maintain these amazing extensions.
K-Tip Hair Extensions: Preparing for Application
Assessing client's hair and expectations
Before beginning the application process, it is important to assess your client's hair from every angle. This includes analyzing their hair’s texture, density, and integrity. A thorough consultation will also help you understand your client’s desired look, lifestyle, and budget.
It is essential to get a clear picture of the client's various hair types to find the best K-Tip Hair Extension solution and explain it at length.
Following the consultation, you can decide on the type and color of hair extensions that are right for the hairstyles of your client.
Ordering the right quantity and color of K-Tip extensions
Ordering the right quantity and color of K-Tip extensions is key to delivering a successful transformation for your clients.
When selecting an extension manufacturer and stylist, it’s important to make sure they offer the highest quality product with colors that perfectly match your client's natural hair.
To ensure you get the best results possible, there are certain steps you must take when ordering K-Tip Hair Extensions from a manufacturer.
1) Select the best quality product for your needs.
2) Choose the right color that matches or blends well with your client's natural hair color.
3) Determine how much hair you will need for each application based on your client’s desired look and lifestyle.
4) Follow the manufacturer’s directions when ordering.
By following these steps, you can be assured that your clients will have the perfect K-Tip hair extensions for their needs.
Gathering necessary tools and equipment
To apply for K-Tip Hair Extensions, you must have all the necessary tools and equipment at your disposal.
This includes a comb, scissors, clips or bands to hold the hair back, cotton swabs and alcohol for sanitizing the hair extensions, thread or fishing line to attach the hair extensions back to natural hair, a bonding tool to attach the extensions to the natural hair, and K-Tip Hair Extension Pliers for attaching and removing the extensions.
Keratin hair extensions utilize non-harmful keratin glue for attaching to your hair. A specialized heat tool is required to melt the glue and secure the extensions. These keratin and extensions look incredibly realistic due to being made from top-notch human hair.
Having these tools close by will make your job much easier and ensure that you can achieve professional results each time.
Preparing the client's hair for application
Now that you have all the necessary tools and equipment, it’s time to begin prepping your client's head and hair.
Start by washing the hair with a mild shampoo and conditioner to remove any dirt or product buildup. After allowing the hair to air dry, use a wide-tooth comb to detangle and smooth out any knots.
Once the hair is completely dry, use clips to separate and section off the top half of the hair away from the roots of the bottom half.
This will help you create a clean canvas for the application, as well as make it easier for you to monitor your progress throughout the extension process.
Step-by-Step Application Process of K-Tip Hair Extensions
Sectioning and dividing the hair
When it comes to applying for K-Tip Hair Extensions, sectioning and dividing the hair is an essential step that must not be overlooked.
This process helps create and maintain a clean canvas for the application, as well as makes it easier to monitor progress throughout the extension process.
With proper sectioning and division of hair, you can guarantee your clients will have an even distribution of extensions with seamless blending with their natural hair.
Preparing the K-Tip extensions for the application
Once the hair is sectioned, you can begin prepping the K-Tip extensions for application.
Start by using cotton swabs and alcohol to sanitize the tips of each extension strand. Once they are clean, use thread or a fishing line to attach small beads onto each extension tip.
These beads will be used to attach the extensions to protect your client's natural hair.
Applying the K-Tip extensions to the natural hair
1. Using a hot fusion or cold fusion method
In the realm of K-Tip Hair Extension application, there are two primary methods - hot fusion and cold fusion.
Hot fusion, also known as thermal bonding, involves using a heat connector to direct heat to melt the keratin tip of the hair extension onto the client's natural hair.
On the other hand, cold fusion, or ultrasonic bonding, utilizes ultrasonic waves to create a bond between the hair extension and the natural hair without applying too much heat. Both methods have their advantages and disadvantages.
Hot fusion is a popular choice due to its strong bond, which can last for up to 4-6 months with proper care and maintenance.
However, it requires a skilled technician to avoid potential heat damage to the client's hair. Cold fusion, while more time-consuming, is ideal for clients with fine or heat-sensitive hair, as it eliminates the risk of heat damage.
The bond created with cold fusion bonded together is equally durable, lasting around the same duration as hot fusion bonded together.
When applying for K-Tip Hair Extensions in manufacturing, hot fusion might involve using heat styling tools to attach the keratin tip of the extension to a weft or strand of hair, while cold fusion could employ an ultrasonic bonder to secure the keratin bond and extension in place without heat.
By understanding the differences between these two methods and selecting the appropriate technique based on the client's hair type and needs, professionals can ensure a successful and long-lasting K-Tip Hair Extension application.
2. Ensuring proper placement and distance from the scalp
Once the hair extension has been attached to the natural hair, it is important to ensure that it is placed at a proper distance from the hair that grows on the scalp.
This ensures that any damage caused by the extensions will be minimal and prevents any unnecessary stress on the client's natural hair.
To achieve this, use K-Tip Hair Extension Pliers to adjust the distance of each extension strand from the scalp.
This tool is specifically designed for K-Tip Hair Extensions and helps to minimize any possible damage to the client's hair.
Repeat the process for all desired sections
Once the first extension strand is attached and adjusted to the desired length, repeat this process for all the individual extensions of the remaining sections of hair.
When applying for K-Tip Hair Extensions, it is important to evenly distribute them throughout the head to create a natural look that blends seamlessly with your client's natural hair color.
It is also essential to avoid over-applying the extensions, as this can cause unnecessary strain on the scalp and lead to hair loss or breakage.
Once all of the extensions have been successfully attached, style them according to your client's preference using a brush and/or a curling wand.
Trimming and Blending the Extensions
Trimming the extensions for a seamless blend
Start by using thinning scissors to blend the extension hair with your client's natural hair, if needed.
When finished, use a styling brush or comb to blend everything and create an even look throughout the full head part.
This will help ensure that your client has a perfectly blended hairstyle that looks completely natural.
Styling the extensions for a natural look
Finally, it's time to style the extensions for a perfectly natural look.
Start by brushing or combing the hair and then use styling products such as hairspray, mousse, etc., to create the desired style.
You can also use a curling wand or flat iron to add texture and shape to the hair. Once the style is complete, use hairspray to hold it in place.
Caring for Keratin Extensions
Your clients may have questions about how to properly care for their extensions, so it is important to provide them with the proper information.
Daily maintenance routines
1. Brushing and detangling
It is important to brush and detangle the extensions every day, using a wide-tooth comb or a soft bristle brush.
Start at the ends k tips of the hair and work your way up to avoid any breakage or damage. This will help keep them looking their best and ensure that they last as long as possible.
2. Washing and conditioning
The extensions should be washed and conditioned every 7-10 days, using a gentle sulfate-free shampoo and conditioner designed for use on synthetic hair.
It is important to be careful not to over-wash or blow dry the extensions, as this can lead to them becoming dry and brittle. After washing, allow the extensions to air dry or use a blow dryer on a low setting.
Removal and Reapplication of Keratin Hair Extensions
Professionals can reapply the same set of K-Tip Hair Extensions multiple times, depending on how well they are cared for.
When the time comes to remove the roots from them, use shampoo or a specialized remover solution to dissolve the keratin bonds and gently comb out the extensions.
Once all of the extensions have been removed, you can then begin prepping the hair and reapplying the extensions again.
How can Alvin Hair Help Your Hair Business?
Alvin Hair is a leading supplier of high-quality keratin hair extensions, offering an extensive range of keratin Hair Extensions, in various lengths, colors, and textures for salons, hair businesses, stylists, and more.
Our products are the perfect choice for any salon or online retailer looking to bring their hair daily business to the next level. We offer K-tip hair extensions, fusion hair extensions, clip-ins, tape-ins, and more.
With years of experience in providing premium quality hair extensions and tools, Alvin Hair guarantees superior performance with every product we offer.
We pride ourselves on our excellent customer service and strive to provide each customer with a personalized shopping experience tailored to their needs.
Whether you’re a salon owner or an online retailer, you can trust Alvin Hair to deliver quality results that will keep your customers coming back from time to time. Visit our website now!


